
Technical Factsheet: Growing Cocoa - Cocoa Farming
Growing cocoa in Cameroon and elsewhere requires meeting certain soil and climate requirements. To succeed at growing cocoa, here is a well-illustrated technical factsheet.
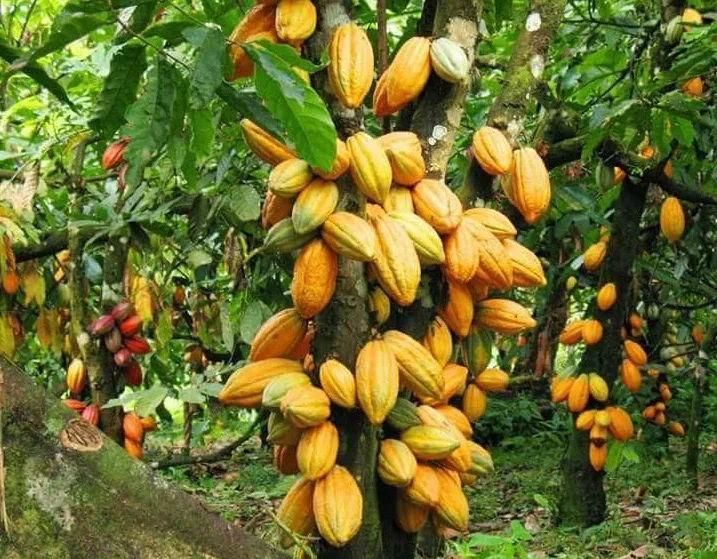
Technical Factsheet: Growing Cocoa
Growing cocoa in Cameroon and elsewhere requires meeting certain soil and climate requirements. To succeed at growing cocoa, here is a well-illustrated technical factsheet.
I. General information on cocoa growing
The cocoa tree is a tropical species grown for its pods. The pulp is used to make various wines, but the main interest lies in the beans, which are used to produce cocoa butter and chocolate.
A low-altitude plant, it grows well up to 1,000 m. Above this altitude, pod development is severely disrupted. The cocoa tree is suited to hot, humid climates. It needs a temperature between 24 and 28C, tolerating up to 32C, and average annual rainfall of between 1,250 and 2,500 mm, well distributed throughout the year, without a strong dry season. Results are better under shade, as the plant needs high relative humidity. The plant does well on soils rich in organic matter, deep, and well drained.
The cocoa tree is a perennial plant. When it starts producing depends on the variety. New hybrids give their first pods between the 2nd and 3rd years, but production becomes substantial from the 5th year onward. It takes 5 to 6 months for a fertilized flower to produce a ripe pod.
II. Crop management
II.1. Nursery
The steps for setting up the nursery are as follows:
Building a shade structure that lets through 25 to 30% of light at 2.5 m above the ground, supported by posts
-Fill black perforated polyethylene bags (20 cm x 12 cm) with a mix of potting soil and topsoil. If this mix is too heavy, add coarse sand to get a light, uniform substrate.
-Build beds under the shade structure. These are rows of bins 60 cm wide and 5 to 10 m long, with stakes firmly driven into the ground and connected by straps.
-Line up the filled bags 4 across, side by side, in these bins so as to fill the bin completely, then water the bags generously,
-Sow, flat, beans freshly extracted from the pods at a depth of 1.5 cm (one bean per bag) and water again.
II.1.1. Where to source the beans to sow?
It's recommended to take beans from pods that are approaching maturity, since they often reach physiological maturity as the pods ripen and quickly lose their ability to germinate. Beans should therefore be sown as soon as possible after harvesting the pods (within 2 days at the latest). Before sowing, the beans are washed with water and fine sand to remove the mucilage. They are then wiped with a jute sack. Beans that are too flat or damaged are removed from the batch to be sown beforehand.
Cocoa germination occurs 4 to 6 days after sowing, and the plant will spend 6 to 8 months in the nursery. The first leaves appear as the seedling stem develops, 10 to 15 days after germination. 1 ha of plantation requires about 1,120 plants at a spacing of 3 m x 3 m. With losses estimated at 3 to 5%, plan for a nursery of about 1,176 plants per hectare, which will require an area of nearly 50 m2.
II.1.2. Nursery maintenance:
Nursery maintenance operations are as follows:
-Watering every 2 days after emergence (15 to 20 days after sowing), preferably early in the morning or in the evening, before sunrise or after sunset;
-Regular weeding;
-1 month after emergence, begin treatments against insects and fungal diseases, once a month;
-Properly clean the paths and surroundings of the nursery;
-Gradually reduce shading one month before transplanting to acclimatize the seedlings to their future environment.
Note:
Fertilization can be applied in the nursery to make cocoa seedlings more vigorous. The use of foliar fertilizers is becoming more common. Application can be done at any vegetative stage. It's also worth noting that bio-fertilization is already being practiced with satisfactory results.
II.2. Planting
II.2.1. Where to plant?
Choosing the plot is essential for cocoa growing. Preferably under secondary forest, the undergrowth should be cleared, with selective felling. Trees prone to attacks by defoliating caterpillars and mirids should be removed. A few trees should be left for shade.
Cocoa can also be grown on a plot with artificial shading. In mixed cropping, cocoa seedlings can initially be introduced into a plantation of bananas, taro, or papayas, so the young cocoa plants - which tolerate high temperatures less well - benefit from the shade created by their leaves.
Similarly, shade can be improved by planting, before field establishment, a fast-growing legume, which also enriches the soil with nitrogen.
Examples of legumes: Gliricidia sepium; Leucaena leucocephala; Erythrina species.
II.2.2. Preparing the plot
Plot preparation should begin at the start of the dry season. After clearing, staking is done according to the chosen spacing:
| Spacing | Density | Nursery | Field shading |
|---|---|---|---|
| 4 m x 4 m | 625/ha | 660 | Heavy shade |
| 3 m x 3 m | 1,111/ha | 1,111 | Medium shade |
| 2.5 m x 2.5 m | 1,847/ha | 1,847 | Light shade |
If the soil is less rich in organic matter (reddish soil), dig holes 40 cm x 70 cm. These holes are then refilled with humus-rich soil (enriched with compost or not) and marked with a sturdy stake.
If the soil is rich in organic matter (dark soil), the hole is dug directly at the time of transplanting.
II.2.3. Planting out:
Planting out takes place between April and June, once the rainy season is well established.
-Select the most vigorous seedlings and leave the rest in the nursery.
-Using a dibber, open holes at the chosen spots, marked by the stakes. The holes should be slightly wider than the soil ball surrounding the seedling's roots, and as deep as that same ball is tall.
-Transplant each seedling with its soil ball after carefully removing the plastic bag. Make sure the seedling's collar sits above ground level.
-Pull the soil back around the base and firm it down well
-Then mulch all around the collar without touching it, to avoid any contamination
-Create additional shade with palm fronds to protect the young cocoa tree.
II.2.4. Maintaining the cocoa plantation
-Replace any losses the following rainy season (dead plants or those that didn't establish well after the first transplanting). Plants that are taken from the nursery for this will be cut back to 30 cm, as they will already have grown quite tall;
-Clear regularly, leaving the cut vegetation on the ground;
-Gradually adjust the shading by removing tree branches and cocoa suckers. If the canopy is fully occupied by cocoa trees, with regular fertilizer application and high rainfall, shading can be removed entirely.
-Clean up the plantation by removing all rotten pods and dry branches, and burn them outside the field (generally starting in January).
Fertilization: fertilizing the cocoa tree is optional, as the plant usually benefits from nutrients released by decomposing fallen leaves. However, nutrient removal for 1 tonne of beans/ha is as follows:
-Nitrogen 20 - 25 kg
-Phosphorus 10 kg
-Potassium 15 kg
Fertilizer applied in a ring around the base of the trees should therefore exceed these removal amounts. It's recommended to apply about 800g/tree of 10-10-20 in split applications.
-1st application 2 weeks after planting, between 5 and 30cm from the base;
-2nd application after 2 years, between 30 and 60cm from the base;
-3rd application in year 4, between 60cm and 1m from the base.
To boost flowering and fruit set, 20g/tree of triple superphosphate and 30g/tree of potassium chloride can be applied at these times.
II.2.5. Controlling diseases and insects:
The cocoa tree faces two main threats. Black pod disease, caused by Phytophthora megakarya and Phytophthora palmivora.
Symptoms:
In the nursery, browning is seen starting from the terminal bud; in the field, brown spots appear on the pods, turning black and eventually spreading over the whole fruit and affecting bean quality.
Treatment:
Between September-October and April-May-June, as soon as the young pods (cherelles) reach 2 to 3 cm:
-Harvest and destroy infested pods away from the field
-Reduce shading
-Alternate application of a contact fungicide and a systemic fungicide;
Mirids (capsids), caused by two formidable insects: Sahlbergella singularis and Distantiella theobroma.
Damage:
Dieback of branches and premature aging of the trees.
Treatment:
June-July; November-December
-Application of an insecticide during the dry season, such as...
Other threats to the cocoa tree.
| Cause | Symptoms | Treatment |
|---|---|---|
| Root rot | -Trees falling and drying out due to root rot | -Uproot affected trees |
| Bugs | -Dieback of branches and leaf distortion | -Benefits from mirid treatment |
| Psyllids | -Growth disorders, especially in the nursery | -Apply CYPERCAL 100EC twice a month for up to 2 years |
| Caterpillars | -Damage to the leaves | -Benefits from mirid treatment |
| Thrips | -Defoliation | -Benefits from mirid treatment |
Note:
Pollination needed for pod formation in cocoa is usually carried out by insects. This is due to the shape of the flowers and is reflected in the under-pollination of the flowers formed. Nearly 60% of the flowers produced are never pollinated. There are also cases of incompatibility in certain varieties, so it's recommended to plant at least two varieties per field to avoid losses of young pods through desiccation (a late sign of incompatibility).
ALSO SEE: Making Cocoa Butter
II.3. Harvest
Harvesting takes place between August and November. A well-managed hectare can produce 1 tonne of marketable cocoa. In Cameroon, smallholder farms have a yield of between 300 and 400 kg of marketable cocoa. Harvesting is done by cutting the stalk of the pods once they have ripened.

Comments (0)
No comments yet. Share your experience or ask your question.